• Work with Melissa Chapman of The Staten Island Family
  • PRIVACY POLICY

The Staten Island family

HEALTHY RECIPES AND PARENTING TIPS

  • Facebook
  • Instagram
  • LinkedIn
  • Pinterest
  • RSS
  • Twitter
  • YouTube
  • Health & Lifestyle
  • Family Fun
  • Parenting Tips
  • Kid Gear
  • Recipes
  • Marriage
  • Fashion & Beauty
  • Work with Melissa Chapman of The Staten Island Family
  • PRIVACY POLICY

6 Steps to Achieve a Quintessentially Chic Milkmaid Braid

May 24, 2017 by Melissa Chapman Leave a Comment

With summer season kicking off this weekend-  I’m already thinking about ways to stay cool. Frizziness and dryness are among the hair issues that I know I’m  constantly combating during these hot, humid days. Luckily, Butterfly Studio Salon stylist Jason J. Dougherty breaks down a super-chic, frizz-fighting braid that will take you from the office to happy hour, and will even withstand the long, sweaty commute all the way home!

Keep reading for Jason’s step by step guide to the Quintessentially Chic Milkmaid Braid

The Office Look

This chic work look is a variation of the Milkmaid Braid. By placing the braids on the bottom, they sport a polished look that is ideal for any professional woman. Instead of bringing the braid to the crown, I took two very large sections of french braids and crossed them before pinning up. Add in some texture for softness and allow pieces to fall around the face for an ultra-effortless look.  Jason J. Dougherty, Butterfly Studio Salon stylist

1. Comb the hair and work out all tangles.

6 Steps to Achieve a Quintessentially Chic Milkmaid Braid

2. Apply a light oil like Oribe Gold Lust Hair Oil and work through the ends.

6 Steps to Achieve a Quintessentially Chic Milkmaid Braid

3. Create a center part and bring it all the way down to the back. Divide hair in two sections.
6 Steps to Achieve a Quintessentially Chic Milkmaid Braid

4. Place a smoothing balm such as Shu Uemura’s Touch of Gloss on the roots and work into the crown.


6 Steps to Achieve a Quintessentially Chic Milkmaid Braid

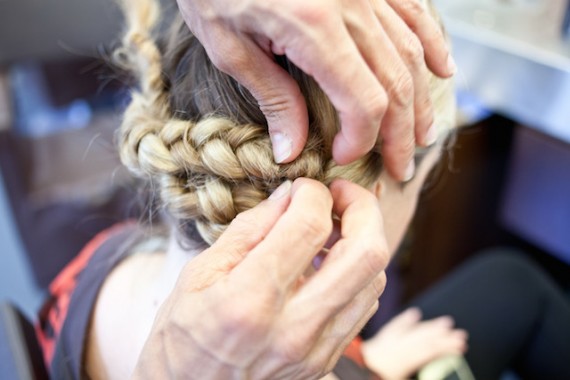
5. Comb hair nice and taught and begin a thick French Braid on one side of the head. Place elastic rubber band to hold ends. Repeat on other side.

6. Bring one braid up and anchor to head with bobby pins. Repeat on the other side.


Share Button

Share this...
Share on yummly
Yummly
  • Share on Facebook (Opens in new window) Facebook
  • Share on X (Opens in new window) X
  • Share on Pinterest (Opens in new window) Pinterest
  • More
  • Email a link to a friend (Opens in new window) Email
  • Print (Opens in new window) Print
  • Share on LinkedIn (Opens in new window) LinkedIn
  • Share on Reddit (Opens in new window) Reddit
  • Share on Tumblr (Opens in new window) Tumblr
«
»

Filed Under: Fashion & Beauty, Featured, MMSG Tagged With: Chic MilkMaid Braid, Hair tips, Summer Braids

Browse by Category

Browse by Date

Leave a Reply Cancel reply

Your email address will not be published. Required fields are marked *

Recipe Rating


This site uses Akismet to reduce spam. Learn how your comment data is processed.

Work with Melissa of The Staten Island Family

Tips to Get Your Date Night On and Bring Romance into Your Relationship

Recent Posts

  • Apple pie street tacos
  • Cranberry Muffins
  • Easy peasy bean salad

Categories

  • beauty
  • Delicious Recipes
  • Family Fun
  • Fashion & Beauty
  • Fashion and Beauty
  • Featured
  • Giveaways
  • health and lifestyle
  • Healthy Bites
  • Home DIY and Improvement
  • Husbands & Wives
  • Kid Gear
  • Love & Sex
  • Marriage
    • Marriage
  • Marriage and Relationships
  • MMSG
  • Motherhood Musings
  • My Sugar daddy
  • Parenting
  • Parenting Tips
  • Relationships
  • Uncategorized
  • Weight Watchers Recipes

Copyright © 2026 · Designed by Restored 316

Copyright © 2026 · The Staten Island Family on Genesis Framework · WordPress · Log in